CSS Box Model: A guide for beginner's


The concept of box model is one of the most fundamental concept in web development. This model is nothing but the way an HTML element is structured, also these elements can be styled using CSS. There are four parts constituting the model and all of them have been discussed below.
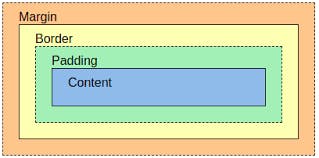
- Content: This is the area which contains text, images, etc. CSS properties
heightandwidthcan be used to set the height and width respectively. - Padding: This is the area between content and border. We can increase this area if we want more spacing. CSS property
padding. - Border: Over padding we have the border, whose width can be increased or decreased with the CSS property
border. - Margin: The last area is margin. We can set a desired value to create spacing over the border with the help of CSS property
margin.
Now, let's try to style an element using CSS.
div {
  width: 100px;
  padding: 10px;
  border: 5px solid grey;
  margin: 2px;
}
This code creates an div element with the following look:

Point to noted, here px stands for pixels which is a CSS unit. There are also other units like rem, % which we will discuss in another blog.
Now, an important thing at this point is to understand the total width of the element and be careful, width sets only the content area width and it's not the full/total width.
Total width = 100px (width of content area) + 20px (left + right padding) + 10px (left + right border) + 4px (left + right margin) = 134px
In a similar way, you can also calculate the total height of the element. Now, that you have understood what box model is, what are waiting for, try to implement what you have learned.
So, with that note let's end the blog. Stay tuned for more such content.